Introduction to Natural Inks
Click here for a tutorial on making pokeberry ink.
Exploring the plants around you to see what colors you can create is an inspiring way to connect with your local ecosystem. This article has some tips and tricks for getting started with your own inksperiments.
Getting started
The best source for natural ink-making is the book Make Ink by Jason Logan. I’m not going to bother with too many step-by-step instructions because I’d just be plagarizing Jason.

Additional ink-making Tips
Freeze materials you won’t use right away. If you’re afraid your fruit will spoil or your flowers will wilt before you can get to them, pop them in a freezer bag. As a bonus, many berries give up their juice more easily after a freeze-thaw cycle!
Use distilled water. Water can vary considerably in terms of pH and mineral content, so distilled water will be most consistent — although experimenting with rain or river water may yield its own interesting results!
Use a dedicated crockpot as a double boiler. I put each plant material in its own glass jar with some distilled water and set them in the crockpot, then fill the crockpot with tap water. This lets me work on multiple batches of ink at the same time. I put the lid on if I’m wanting to actually cook the material, and take it off if I want to evaporate some water off to concentrate the color.
Try subbing an 80-micron nut milk bag for coffee filters. You may still need a coffee filter for your final pass, but getting a couple of these will cut down on waste.
Extract color with alcohol if water doesn’t work. Jason Logan graciously shared this tip with me after I asked him how he got such a vibrant green color from his nettle leaves: blend your plant with isopropyl or grain alcohol, let sit for a few hours, and then strain through a coffee filter into a glass container. Let the alcohol evaporate completely, and then rehydrate the remaining residue with water. I’m still perfecting my technique, but I wanted to pass it on!
kansas plants to try
Practice responsible foraging: only take a little of each plant (you don’t need much at all!) and get permission if you don’t own the land. If you use invasive plants, discard seeds in the trash (not as yard waste or compost).
This isn’t a complete list, just plants I’ve tried or seen referenced. Considering it a starting point!
Italics = plants I’ve successfully tried, ° = recipe in Make Ink. Links go to online recipes.
Flowers: Goldenrod, hibiscus, marigold, calendula, grape hyacinth, red bud, forsythia, purple iris
Fruits: pokeberry,° privet berry, wild grape,° elderberry, mulberry, redcurrant, raspberry, sumac, Osage orange
Seeds: acorn caps,° walnut,° dock, amaranth
Leaves: nettle, dock, ornamental plum, horsetail, Japanese maple
Roots: false indigo, iris, dock
Bark/Twigs: Osage orange, plum, barberry
Other: oak gall,° inkcap mushrooms, some lichens, ground-up earth and minerals
Household fruits and vegetables to try: avocado skins/pits, beets, red cabbage, red/yellow onion, turmeric,° paprika, greens, black beans, greens like parsley, some teas
ph experimentation
Changing the pH (acid/base) level of a natural ink can dramatically shift its color. It’s worth keeping a record of how these substances affect your ink’s color.
ph levels of common household substances
(most basic to most acidic)
Lye: 13
Washing soda: 11
Ammonia: 10.6-11.6
Borax: 9 (can crystallize in suspension)
Baking soda: 8 (hard to dissolve)
7: Neutral
Cream of Tartar: 6.7-6.9
Alum (1%): 3 (can crystallize in suspension)
Citric acid: 3-6% (couldn’t find level for my NOW Foods brand)
Vinegar (5%): 2.5-3
Cleaning vinegar (6%): 2
Other substances to try: vinegar + rusty metal, copper + salt + vinegar, ferrous sulfate.
I like to use some of my dropper bottles to store my additives (straight if it’s a liquid, or in a suspension if it’s a powder). If it’s a suspension, write down how much you added to each bottle.
Creating a test sheet: on a piece of watercolor paper, write the name of your ink and put down a sample of the unadulterated color as a control. Then write the names of your additives on the paper with enough space for a test swatch of ink next to each one. Add a drop or two of additive to each test swatch and let dry completely to see how the additive affects the color.

A (very) brief overview of art techniques
These fall into three main categories: materials you put down before the ink, ways of applying the ink, and materials you put down after the ink.
masking/resist (before ink)
Gelly glaze pens
White colored pencils, crayons, china markers
Painter’s tape (stick to your arm or pants first to make less sticky)
Rubber cement or watercolor liquid friskit (rub off after ink is dry)
White school glue
Gesso or matte medium
Application Techniques
Paintbrush (experiment with wet vs dry paper)
Put down a puddle of water and drop color in
Brush onto a piece of plastic and then press paper onto plastic
Sponge, with or without a stencil
Dip a piece of string in wet ink and place or drag over paper
Try different implements, like dip pens or even sticks
surface techniques (after ink)
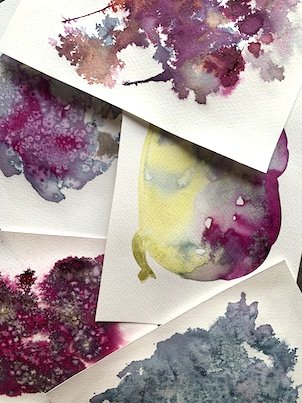
Sprinkle salt on damp paper to create lighter snowflake-like shapes. Experiment with different powdered material like washing soda, baking soda, or citric acid.
Use a straw to blow wet ink across the paper
Mix in a drop of detergent and try blowing bubbles on the sheet of paper
Use a spray bottle to spray water on the wet ink
Use the corner of a paper towel to lift excessive ink out of puddles, or scrub / dab to create texture
Crumple up plastic wrap, rest on wet ink with a weight, and peel off when dry
Flattening Your Paper
After your paper is dry, you can try un-warping your paper by misting the back of it with water and weighing it down under a heavy book — use a few layers of clean blank newsprint (available at art or moving stores) to protect surfaces.
Natural ink is a living thing.
One way natural inks differ from watercolors is that their chemistry makes them react with each other in unpredictable ways. Yellow + blue may make green, but it may also create a completely different color!
Many inks tend to fade with light exposure over time. You can either embrace their transient nature, or use a spray fixative to protect them. Jason Logan recommends casein-based Spectrafix.
resources and inspiration
This is just scratching the surface of what’s possible with natural inks. Check out the resource list below for further info and inspiration!
Julia’s Natural Ink & Dye Pinterest Board
reading
Make Ink - Jason Logan
The Colour (Jason’s Substack)
Végétalitude (in French)
Instagram accounts

Last updated: 7 Feb 2023